Mitigation Strategy
Install a rain garden
Overview
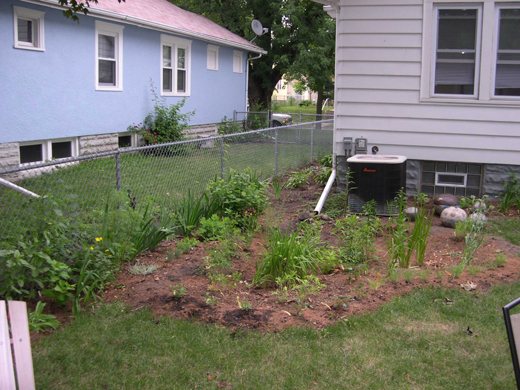
Installing a rain garden is a great, low-maintenance, inexpensive way to address drainage issues and reduce flooding. A rain garden is a low-lying area in the landscape that is planted with wetland or wet-tolerant plants, such as wildflowers and other native vegetation. This vegetation soaks up stormwater, mainly from the roof of a house or other impervious surfaces. As a result, rain gardens help protect streams and lakes from pollutants carried by urban stormwater—lawn fertilizers and pesticides, oil and other fluids that leak from cars, and numerous harmful substances that wash off of roofs and paved areas.

Rain gardens fill with water during a storm. After the rain has stopped, the water collected slowly filters into the ground rather than becoming runoff that ends up in a storm drain. Rain gardens allow approximately 30 percent more water to soak into the ground than a conventional patch of lawn, while also providing habitat for pollinators and birds. When selecting a site to plant a rain garden, it is important to look for an area with a 2-12% slope that water flows into or across naturally. If the site has a natural depression and water does not remain there for a long time after a rainfall, this could be an excellent location.
Rain gardens take careful planning, and work best under certain conditions. The design must avoid standing water (which may breed mosquitoes), potential damage by vehicles or children, and similar concerns that can arise when a new landscaping technique is introduced. It also needs to account for soil types. If the soil in the chosen area is more than 40% clay, a rain garden is not a good option since this type of soil does not allow rainwater to infiltrate well, causing runoff. If your soil has a small amount of clay, soil amendments such as compost or manure can be added to improve soil health and boost infiltration.
Size and shape are also important factors in a rain garden. A rain garden’s size should be approximately 1/3 the size of the area that will drain into it. For example, if the rainwater entering the garden is from a roof’s downspout, and the surface area of the roof is 300 square feet, the rain garden should be 100 square feet. Most people choose their rain garden shapes to be organic and flowing, such as kidney bean shaped. Whatever the shape, it is important that the garden be longest parallel to the runoff entering the garden. This will maximize the amount of runoff captured by the rain garden.


Property Characteristics
Property Scale
Single Property
Real Estate Type
Single-family residence
Multi-family residence
Manufactured home
Business
Government building
Foundation Type
Slab-on-Grade
Crawlspace
Basement
Property Location
Coastal
Past Flood Depth
Shallow
Unsure
Debris Flow Potential
Yes
Unsure
Structure Condition
Fair-to-excellent condition
Less than fair condition
Implementation Factors
Annual Maintenance Required
Low
Action Required If Flood Is Imminent
No, Passive
Relative Cost
$
$$
Level of Effort
Professional
DIY
Next Steps
- Before getting started, complete an infiltration test to make sure that location chosen for the rain garden drains properly when filled with water. To do this, simply dig a hole eight inches across by eight inches deep, and fill the hole with water. (Fill it once if it has just rained recently, and fill it twice in a row if conditions are dry.) If the water in the hole drains within eight hours, this is a good site for a rain garden.
- Once you have confirmed your soil is favorable to a rain garden, hire a company to build the rain garden or build the rain garden yourself.
- If doing it yourself, make sure that you have all of the necessary tools, such as a shovel, rake, bucket (to collect soil), tape measure (to measure the rain garden), rope, garden hose, or marking paint (to draw the shape of your garden), and a level device (to level the bed of the rain garden). (If available, a small tiller may also be useful.)
- Get started by digging out the excess soil and create a depression. The garden bed should be 4-6 inches deeper than the ground level. If your garden is on a slope, you should dig down by this amount or slightly deeper.
- Use the excess soil that you dig out to create a berm. The berm of the rain garden should be equal to the height of the ground level on the “up,” or higher side, of the rain garden.
- After all of the excel soil is removed and soil amendments are added, till the soil to a depth of 6-8 inches. This will improve infiltration rates. After you are finished tilling, make sure that the garden bed is level. This is important for a rain garden because the rainwater runoff entering the garden should disperse and infiltrate evenly across the garden bed.
- Before planting, spot and space the plants where you want them in your rain garden.
- When finished planting, cover your rain garden with a shredded, hardwood mulch. This type of mulch will resist floating when rainwater enters the garden.
Special Considerations
- Be careful not to redirect water flow from your property onto another property. No adverse impact (NAI) floodplain management is an approach that ensures the action of any property owner, public or private, does not adversely impact the property and rights of others. NAI calls for any adverse impact caused by a project to be mitigated as part of the project. By following NAI principles, you can: prevent flooding from increasing or damaging others; see a reduction in flood losses over time; and avoid challenges and lawsuits over causing or aggravating a flood problem.
- Check out the financial assistance page to see what funding or financing opportunities might be available to you.
Reduce Flood Risk
https://www.reducefloodrisk.org/mitigation/install-a-rain-garden/
Printed: 05/21/2026